Showing posts with label Tutorial. Show all posts

Sunday, November 20, 2016

Create a Forum From Scratch with PHP/MySQL [Tutorial]


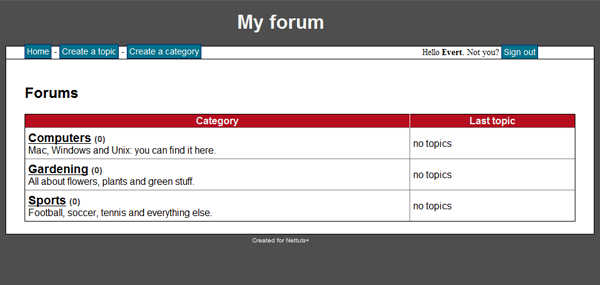
If you're looking to start or just improving your programming skills with PHP and MySQL this tutorial from Envato Tuts+ is a good place to start like they reference on the beginning of the tutorial:
"In this tutorial, we're going to build a PHP/MySQL powered forum from scratch. This tutorial is perfect for getting used to basic PHP and database usage."
- From: How to Create a PHP/MySQL Powered Forum From Scratch
And in 12 easy steps they cover all the basic functionalities of a forum:

- Creating MySQL Database Tables
- Forum "Design" with Header/Footer System
- User Sing Up, Authentication and User Levels
- CRUD of Categories, Topics and Replies

That will look more or less like the image bellow:


Monday, March 19, 2012

Insert one or multiple rows in mysql db using php

Normally, one of the first thing that you need to do after connect to a mysql database is insert data. This tutorial is about inserting a single row or multiple rows into a mysql database using php. If you don't know how to connect to a database check our previous tutorial "Connect to a mysql database using php".

Let's imagine for this example that my table name is "people" and inside this table i have 3 columns "id", "first_name" and " last_name".

This way to insert a single row with the person "Chuck Norris" i need to execute the following query:

$validation = mysql_query("INSERT INTO platform_types 
                         (id, first_name, last_name) 
                         VALUES ('1', 'Chuck', 'Norris')"
                         ,$db_con);

if (!$validation) //test query for errors 
{
    echo("Error in query: " . mysql_errno($apbl_db_con) . ": " 
    . mysql_error($apbl_db_con) . '
');             
}
//Closing connection (don't forget to close the connection 
//when you don't need to query stuff to the db)
apbl_db_close($apbl_db_con); 

The $db_con variable is the one returned by mysql_connect when you connect to the database. If you need to insert multiple rows at same time the procedure is the same but you add more values at the end like this:

$validation = mysql_query("INSERT INTO platform_types 
    (id, first_name, last_name) VALUES 
    ('1', 'Chuck', 'Norris'), 
    ('2', 'Jackie', 'Chan')",$db_con);

//...the rest of the code it's the same.
 Notice that if your "id" column is set to auto-increment (usually is) you don't need to give a value to the "id" in the query because it will auto-increment by him self. Then your query will look like this:

$validation = mysql_query("INSERT INTO platform_types 
    (first_name, last_name) VALUES 
    ('Chuck', 'Norris'), 
    ('Jackie', 'Chan')",$db_con);

//...the rest of the code it's the same.

Thursday, March 15, 2012

Connect to a mysql database using php

In almost all web projects now a days you need to use at least one database to store information. So let's start using a database! First step is to connect to the database.
For this example let's imagine that a i have mysql running on the adress "localhost" with the username "root" and password "password". The database name is "mydatabase".

With this information we can start coding our php script to connect with the database.


I hope it has been helpful, in the next tutorial let's see how to insert data on your  mysql database using php.

        
//Try to connect to database
$con = mysql_connect('localhost','root','password'); 
      
if (!$con) //Test if connection was successfully
{
    echo ('Error on connect: ' . mysql_errno() . ": " 
    . mysql_error());
}
else
{
    //Connect to the table inside the database
    $db_check = mysql_select_db('mydatabase', $con); 
    if (!$db_check)
    {
        echo ('Error on the database : ' . mysql_errno() 
        . ": " . mysql_error());
    }
}

Next tutorial:  "Insert one or multiple rows in mysql db using php".

Tuesday, March 6, 2012

How to license your free software with GNU GPL v3

As you all know a software license is something that tells the users what they can or cannot do with that especific software and it's also a way of giving some credit to the author for his software.

There are several types of licenses:

- Perpetual license
- Subscription license
- Freeware license
- Shareware license
- OEM (original equipment manufacturer)
- Educational or Academic Software
- Not for Resale (NFR) Software License
- And more...

This post is specifically about Freeware Licences and specially about Open Source because, as you already know, inside free software applications we have some that are open source and others that are closed source.

So let's see a little bit more about free and open source software (quoting Wikipedia.org):
A primary consequence of the free software form of licensing is that acceptance of the license is essentially optional — the end-user may use, study, and privately modify the software without accepting the license. However, if the user wishes to exercise the right of redistributing the software, then the end-user must accept, and be bound by, the software license.
Free and open-source licenses generally fall under two categories: Those with the aim to have minimal requirements about how the software can be redistributed (permissive licenses), and those that aim to preserve the freedoms that is given to the users by ensuring that all subsequent users recives those rights (copyleft Licenses).
An example of a copyleft free software license is the GNU General Public License (GPL). This license is aimed at giving all user unlimited freedom to use, study, and privately modify the software, and if the user adheres to the terms and conditions of GPL, freedom to redistribute the software or any modifications to it. For instance, any modifications made and redistributed by the end-user must include the source code for these, and the license of any derivative work must not put any additional restrictions beyond what GPL allows.[1]
Examples of permissive free software licenses are the BSD license and the MIT license, which give unlimited permission to use, study, and privately modify the software, and includes only minimal requirements on redistribution. This gives a user the permission to take the code and use it as part of closed-source software or software released under a proprietary software license.

free and open source license GPL


One of the most known and used license for this type of software is the GNU GPL(General Public License) that is now on version 3. The bases of this license, quoting gnu.org, are:

The Foundations of the GPL

Nobody should be restricted by the software they use. There are four freedoms that every user should have:
  • the freedom to use the software for any purpose,
  • the freedom to change the software to suit your needs,
  • the freedom to share the software with your friends and neighbors, and
  • the freedom to share the changes you make.
When a program offers users all of these freedoms, we call it free software.
Developers who write software can release it under the terms of the GNU GPL. When they do, it will be free software and stay free software, no matter who changes or distributes the program. We call this copyleft: the software is copyrighted, but instead of using those rights to restrict users like proprietary software does, we use them to ensure that every user has freedom.
So if you developed a software and you are thinking about distributing it as a free software, i created a little video explaning what you need to do to license your software with GNU GPL v3. I am not an expert on this but i have already done this and i am just trying to share my experience.

Video turorial:


Sunday, February 26, 2012

Read a file line by line to the end in VB.NET

This tutorial it's about reading a file line by line until the end in VB.NET. This is usefull, for instance, if you are using this file as a settings file and you inserted one setting per line then you can read them by order.

Visual Studio screenshot:


Code:


Imports System.IO
Public Class Form1
    Private Sub Button1_Click(ByVal sender As System.Object, ByVal e As System.EventArgs) Handles Button1.Click
        Dim file_dir As String = "file.txt"
        'parse file
        Try
            Dim sr As StreamReader = New StreamReader(file_dir)
            Do Until sr.EndOfStream
                TextBox1.Text += vbNewLine + sr.ReadLine()
            Loop
            sr.Close()
        Catch ex As Exception
            MessageBox.Show(ex.Message)
        End Try
    End Sub
End Class

In this case you are reading and adding each line to a textbox but you can read this to a string array and keep the information to work with later. It's also important to use try catch because if the file doesn't exist or you don't have permissions to read it will not crash the application.

Monday, February 20, 2012

VB.NET Write data to XML using a DataSet


In this tutorial i will talk about getting the name of all the files (in this case images) in a directory and store them into a XML file using a DataSet in VB.NET.


Code:
Imports System.IO

Public Class Form1
    Dim images_dir As String = "C:\myfolder"
    Dim xml_dir As String = "C:\myfolder"
    Dim image_list As String()

    Private Sub Form1_Load(ByVal sender As System.Object, ByVal e As System.EventArgs) Handles MyBase.Load

    End Sub

    Private Sub Button1_Click(ByVal sender As System.Object, ByVal e As System.EventArgs) Handles Button1.Click
        DataSet_images.Tables("Table1").Clear()
        image_list = Directory.GetFiles(images_dir)
        Dim filename As String
        Dim counter As Integer
        For Each filename In image_list
            counter += 1
            DataSet_images.Tables("Table1").Rows.Add(New Object() {counter, filename})
        Next filename
        DataSet_images.Tables("Table1").WriteXml(xml_dir + "\images.xml", XmlWriteMode.IgnoreSchema)
    End Sub
End Class
Video Tutorial:


Monday, February 6, 2012

Textbox for numbers only VB.NET

Sometimes we need to limit our user inputs to only numbers for instance in a quantity input and for that i leave here a tutorial on how to do that in VB.NET.

Code:

Public Class Form1    Private Sub TextBox1_KeyPress(ByVal sender As Object, ByVal e As System.Windows.Forms.KeyPressEventArgs) Handles TextBox1.KeyPress
        If (Asc(e.KeyChar) >= 48 And Asc(e.KeyChar) <= 57) Or Asc(e.KeyChar) = 8 Then
            e.Handled = False
        Else
            e.Handled = True
        End If
    End Sub


End Class


Video tutorial:


Friday, January 27, 2012

Checking if a directory exists and creating one in VB.NET

This tutorial contains you the necessary code to check if a directory exists and to create one if it returns false using VB.NET.

Code:

Imports System.IO


If Directory.Exists("c:\mydir") Then
        MessageBox.Show("Directory exists!")
Else
        Directory.CreateDirectory("c:\mydir")

        MessageBox.Show("Directory created!")
End If

Thursday, January 26, 2012

Minimize a VB.NET application to system tray using NotifyIcon

This tutorial is about using the NotifyIcon in VB.NET to minimize your application o the system tray that can be very usefull in applications that run as a server in background for instance.

Form screenshot:

VB.NET Form

Code:

Public Class Form1

    Private Sub Form1_Load(ByVal sender As System.Object, ByVal e As System.EventArgs) Handles MyBase.Load

    End Sub

    Private Sub Form1_Resize(ByVal sender As Object, ByVal e As System.EventArgs) Handles Me.Resize
        Try
            If Me.WindowState = FormWindowState.Minimized Then
                Me.Visible = False
                NotifyIcon1.Visible = True
                NotifyIcon1.ShowBalloonTip(1, "NotifyIcon", "Running Minimized", ToolTipIcon.Info)
            End If
        Catch ex As Exception
            MsgBox(ex.Message)
        End Try
    End Sub

    Private Sub NotifyIcon1_MouseDoubleClick(ByVal sender As System.Object, ByVal e As System.Windows.Forms.MouseEventArgs) Handles NotifyIcon1.MouseDoubleClick
        Try
            Me.Visible = True
            Me.WindowState = FormWindowState.Normal
            NotifyIcon1.Visible = False
        Catch ex As Exception
            MsgBox(ex.Message)
        End Try
    End Sub

    Private Sub OpenToolStripMenuItem_Click(ByVal sender As System.Object, ByVal e As System.EventArgs) Handles OpenToolStripMenuItem.Click
        Try
            Me.Visible = True
            Me.WindowState = FormWindowState.Normal
            NotifyIcon1.Visible = False
        Catch ex As Exception
            MsgBox(ex.Message)
        End Try
    End Sub

    Private Sub ExitToolStripMenuItem_Click(ByVal sender As System.Object, ByVal e As System.EventArgs) Handles ExitToolStripMenuItem.Click
        Me.Close()
    End Sub
End Class


Video Tutorial:

Sunday, November 27, 2011

Java search bar - Click event and Enter key event (Netbeans)

Create a search bar in a java application using netbeans, configuring click event listener and ENTER key event listener in the jTextField.


Code for button click event listener and key listener in jTextField:

        jButton1.addActionListener(new ActionListener()
        {
            @Override
            public void actionPerformed(ActionEvent e)
            {
                jLabel1.setText("You searched for: "+jTextField1.getText());
            }
        });
        
        jTextField1.addKeyListener(new KeyAdapter()
        {       
            @Override
            public void keyPressed(KeyEvent e)
            {
                if(e.getKeyCode() == KeyEvent.VK_ENTER)
                    jLabel1.setText("You searched for: "+jTextField1.getText());
            }
        })


Saturday, November 26, 2011

Zymic - Free Web Hosting


Lots of people wounder how they can put thir website online without spending much money or no money at all. There are several way of doing that and Zymic is on of them. Zymic provides a free hosting service with the following caracteristics:

Free Web Hosting - General Features
- Disk Space 5000MB
- Data Transfer (Monthly) 50000MB
- Control Panel ZHCP
- Number Of Accounts Unlimited
- FTP Access Yes
- Advertisements No

Free Web Hosting - PHP And Databases
- PHP Ver 5.2.12
- MySQL Databases 3
- SQLBuddy Ver Custom

Free Web Hosting - Domain Names
- Sub-Domains Yes
- TLD Domain Yes

Free Web Hosting - Zymic Hosting Control Panel (ZHCP) Features
- File Manager Yes
- MySQL Management Yes
- Free Support Yes
- Account Settings Yes

I am using Zymic for a while and i'm really happy with their service.


Thumbs up to TweakUniverse for this video.

Monday, November 21, 2011

Java Core Tutorial for beginners

I found a nice Java core tutorial presentation that talks about the basic of Java to help you get started in Java Programming. So if you are a complete Java beginner this could be your way in.
You can check the tutorial here:


Or you can download it here:
Download Java Tutorial.

So a thumbs up for mister Vijay A Raj that made this tutorial.